Showing posts with label computer tricks. Show all posts

Wednesday, 3 August 2011

Installing a wireless router

nstalling a wireless router and setting up a home wireless network doesn’t cost the earth, can be accomplished by anybody using the simple steps and know how available in the guides you will find here at PC Tips and Tricks.
Do you want to be able to sit comfortably in your living room or maybe outside on the patio in the sunshine whilst surfing the internet with no wires to worry about?
How about sharing a common printer wirelessly from any room in your house?

Installing a Wireless Router – Broadband connection sharing

Your home broadband connection can be used to provide internet access for more than one PC, laptop or gaming console etc.
There are a number of ways of providing this access for your home computers and other devices but the easiest and safest way is by installing a wireless router which will allow all of your PCs etc to connect to the internet independently and also allow file sharing between PCs and laptops connected to your home network.
Why do we need a router? Well, we need a router if we want to connect a number of PCs, game consoles etc through to the Internet via one ISP (Internet Service Provider) without having to pay for a full broadband subscription for each device.
Why is it safer to use a router? Well, your router will have a built-in hardware firewall which, when configured correctly, will help provide protection against hackers and the like trying to infiltrate your home network and wreak havoc perhaps obtaining sensitive information such as passwords and credit card details etc.
A hardware firewall will provide greater security than a software firewall on its own and a combined hardware and software firewall setup will provide excellent security against online threats.
With a wireless router all of your PCs will be able to access the internet at the same time and with your home wireless network you will be able to share printers and files, use wireless capable gaming consoles and your Apple itouch or Apple iphone devices etc.

Installing a Wireless Router – Other options

As we said earlier, the wireless router isn’t the only way to share an internet connection but it’s certainly the most tidy, inherently safe and convenient way.
A simple wired router will allow you the same functionality and protection with an in-built firewall but you will then have to install unsightly CAT 5 cabling around your home. Agreed, you can hide these cables away within cupboards and behind wall boards etc but it is so much easier installing a wireless router for your home network.
Another option that is open to you is the Windows ICS (Internet Connection Sharing) method where you can allocate one of your computers to be the main ‘gateway’ to the internet and your other computers would then access, again using Cat 5 cabling between PCs, the internet via your main PC. This would mean that your main PC would need to remain on all of the time that your other computer users want to access the internet. Inconvenient and a great waste of electricity – let’s get green now guys and girls!

Installing a Wireless Router – What is a router

So, what exactly is a router and what does it do?
Ok, a router – in simple terms – is a device that sends data between networks in the form of data packets (small chunks of data).
It is connected between at least two networks - in our case between our home network, which is called a LAN (Local Area Network) and the Internet, which is on the WAN (Wide Area Network) side of the router.
The router acts as a gateway between these two networks.
Hey, it’s all quite simple really; your wireless router basically acts as an interface between your broadband internet connection and your home PCs either wirelessly or via Ethernet cabling.
Your router will incorporate a switch, which acts like an intelligent hub, and controls data transfer between all PCs and devices connected to the router Ethernet RJ-45 ports (on our LAN side of the router) or router wireless access point - WLAN (Wireless Local Area Network) allowing you to share files and data between devices on your home network.
The router takes note of which computer or computers are addressing particular sites on the Internet and ensures that data to and from the Internet is tracked back and forth to the correct computer on your network.
The router does all this using various protocols, headers and tables etc to allow correct communication between devices and between each device and the Internet.
NAT (Network Address Translation) allows all of your computers to share a single IP address on the Internet by combining the traffic from your PCs and laptops etc individual IP addresses into one single internet IP address.
So, from the outside, your individual computers appear as one. Your ISP (Internet Service Provider) does not need to provide individual IP addresses for each of your PCs – that would be very expensive!
Your router communicates with your ISP via a single IP address and has an internal ‘switch’ which assigns each PC or device on your network with a unique IP address allowing all to share the internet connection. The switch also provides communication between your PCs etc across your home network.
Your wireless router provides a WLAN (Wireless Local Area Network) to provide the same function for all your wireless connected devices such as laptops, wireless desktop PCs and wireless enabled game consoles etc.

Installing a Wireless Router – Recommended setup

Although we are discussing installing a wireless router setup here you should probably still configure your main PC using a permanent wired Ethernet connection.
Why? - Well initial setup will be carried out using a wired connection and we would recommend, especially if you have a PC situated close by your router, that you retain one PC with a direct connection as trouble shooting etc will be much easier using this connection.
Wireless signals can be greatly affected by the surrounding environment – microwave ovens, walls, floors, cordless phones etc can all have an impact on your signal. It is far easier to troubleshoot when you don’t have to worry about whether the problem is just down to a poor wireless signal.
Wireless signals can be greatly affected by the environment (microwave ovens, walls, floors cordless phones etc) can all have an impact on your signal.

Installing a Wireless Router – Typical wireless router and connections

Here is a typical router:
Connections at the rear

Note the various inputs and outputs as follows:
A port to plug in your telephone line if you have a DSL type router, or Ethernet input for a cable modem if you have a cable ISP service.
A number of Ethernet RJ-45 ports, typically four, to allow connection of your wired LAN (connection for each wired computer or device on your home network).
The remaining connector is the jack socket to allow connection of DC input power from the mains adapter.
Status Led’s giving you information on ISP, Wi-Fi and Ethernet port status etc.
A wireless capable router may also have one or two antennae attached to provide for your WLAN although on some makes the aerial may be integral to the device.

Installing a Wireless Router – Choosing a wireless router

To setup for Windows Wireless Networking as discussed you will need either a WAP (Wireless Access Point) and a separate router or a router with an integral WAP.
When installing a wireless router we would recommend that you choose a combined type of wireless router – by this we mean that your router has an integral switch, wireless access point and modem (DSL type ISP).
This will be easier to set up and there will be one less power cord and interconnection cable to contend with making for a far neater solution.
If you have a cable modem then you will need to connect this to your router via an Ethernet Cat 5 type cable. You will need to select a router that is suitable for use with a cable modem / set top box.
If you have your ISP provided via a phone line then you will have a DSL type modem and again you will need to select a router that is suitable for this type of ISP connection.
As we said, buy a combined DSL / Wireless router if possible and ditch your old modem.
Linksys, Netgear, Vigor and D-Link will all provide excellent results – our recommendation would be the Netgear DG834 combined wireless router for DSL type setups simply because we have had years of excellent service and trouble free operation.
Netgear’s WGR614 provides another excellent product with an input for cable modem users together with four Ethernet ports and 802.11g Wi-Fi.
When choosing your wireless router you should consider whether you will need a number of Ethernet ports for permanent or temporary hard wired cable connection as discussed earlier in this article.
Also look at the routers supported wireless standards. What does your chosen router support and is it compatible with your PC and laptop adaptors?

Installing a Wireless Router – Wireless standards

Generally the faster the better here, common standards for wireless networks today are as follows:

  • 802.11a - 54Mbits/second at 5GHz operating frequency
  • 802.11b - 11Mbits/second at 2.4GHz operating frequency
  • 802.11g - 54Mbits/second at 2.4GHz operating frequency
  • 802.11n - Up to 300Mbits/second at 2.4GHz

If starting your network from new you should only be concerned with the 802.11g and 802.11n standards really.
All of the above standards are generally compatible with each other with the exception of the 802.11a standard which runs at a different frequency to the others and cannot communicate with them (note that there are variants of the 802.11n that run at both 2.4GHz and 5GHz; look very closely at the specifications when selecting your router and adapters).
If you have devices with wireless adaptors that use the old 802.11b standard then 802.11g routers and some 802.11n routers are generally backwards compatible with these older 802.11b devices.
The 802.11n routers are theoretically capable of up to 300M bits/second data transfer rates but in practice you will be lucky to reach anywhere near this transfer rate! Typical maximums will be up to say 150Mbits/s.
For all standards the achievable data transfer speed will typically be up to one half the manufacturers stated speeds at best.
For across network transfer rates, your slowest device will dictate the transfer speed so if for instance you have a laptop with an 802.11b adapter fitted which only operates at 11Mbits/s maximum then this is all you will achieve even if your router is capable of working much faster.
As we said earlier, distances, barriers such as floors and walls, interference from mobile phones and microwave ovens etc will all act to slow down your wireless network speed – a wireless network will throttle back the transfer speed as your wireless signal strength decreases!

Installing a Wireless Router – Wireless router security

Check that the wireless router you select has adequate security features otherwise anyone within range of your wireless signal will have the opportunity to hop on to your network and surf the web for free not to mention gaining access to your home network with all of your files and data!
Ok, so you may not get hacked into but it’s quite likely that freeloaders or neighbors, maybe unknowingly as your signal is not encrypted, may make use of your internet connection for free thereby hogging your ISP bandwidth.
Check that your router supports as a minimum WEP encryption security and preferably WPA or WPA2 level security. To use WPA type security you will need to be running Windows XP Service Pack 2, Vista or Windows 7.
Check that your router can act as a DHCP server, which basically means that it can automatically assign IP addresses to your entire network PCs and devices allowing for much easier setting up. All new routers should be capable of doing this for you. 

Track Facebook likes and shares on your website

rack Facebook shares and likes without third party application

First you have to install the feature. It goes like this:
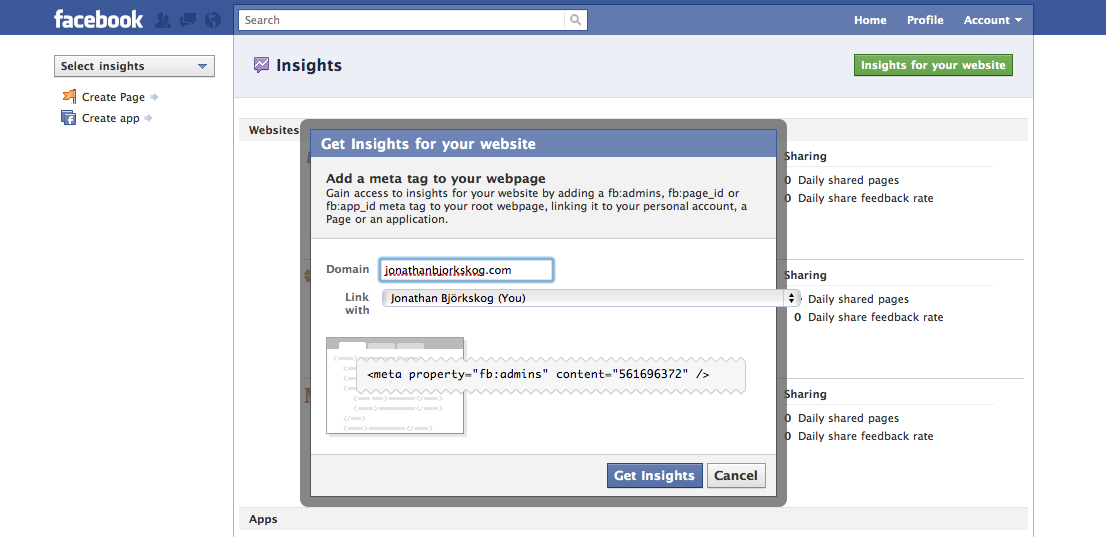
  1. Go to facebook.com/insights.
  2. Click on the little green button insights for your website in the upper right corner.
  3. A Facebook popup appears
    Track Facebook likes and shares for your website
    The tracking is very easy to set up
  4. Write your URL in the “Domain” box.
  5. Chose who is going to be able to see the insights for the website or blog in the box named “Link with”. You can link it to yourself or to a Facebook fan page. If you link it to a Facebook fan page, every admin for that page is able to check the insights. This is the way you have to go if you want more than one person (you) to have access to the Insights data.
  6. Go to your website and paste the  in your website’s HEAD section. Change the *** to your number, in my case it was 
  7. Click “Get Insights” and you are done. If you do not see any insights, you might have to refresh the page for being able to see the insights.

What does the Insights “like and share”-data mean?

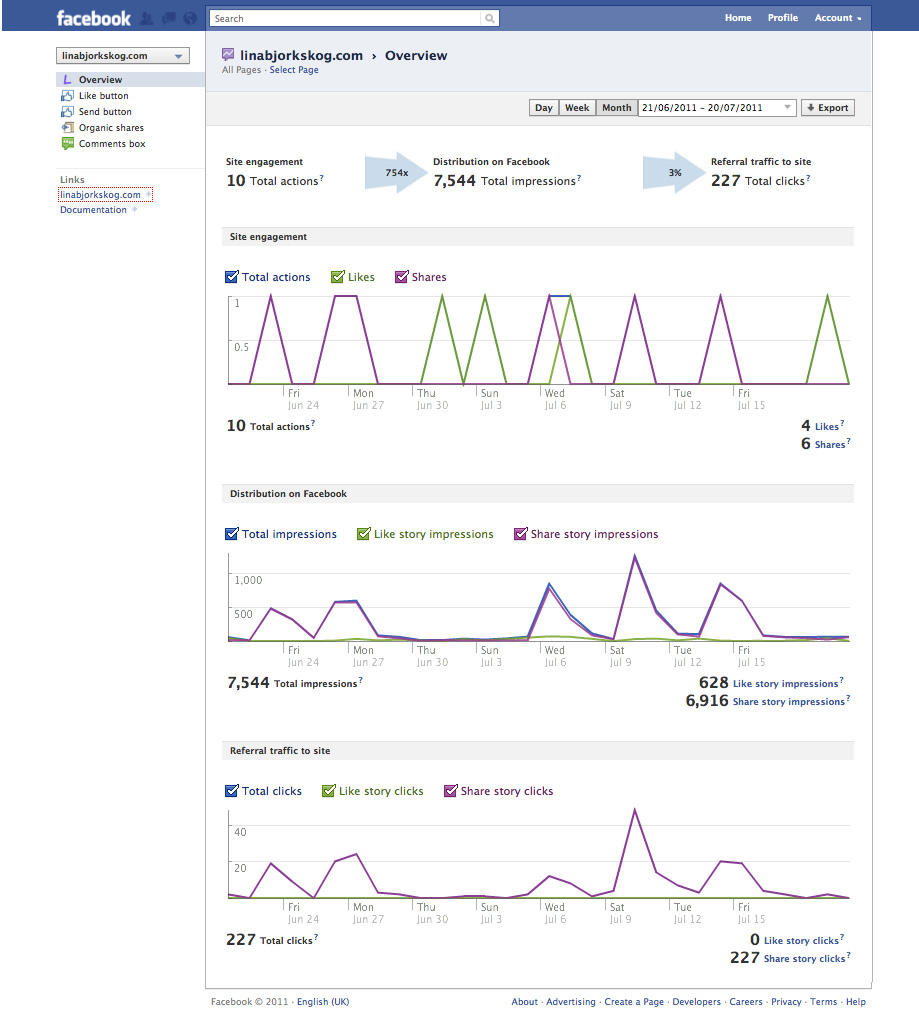
When you have installed the button you are able to track Facebook likes and shares, great,  but what does the data mean? You are probably seeing this view right now if you have followed the steps. (Data for my vife’s blog)
Facebook Insights overview
First you see the date. It is by default the last month, like in so many other analytics tools.
Then you see the “Site engagement“. This is the fun part! You can see how many times the content have been shared the last month, either by people clicking on the like button or then by sharing it manually to Facebook. For that blog it is ten times the last month.
The next arrow is “Distribution on Facebook“. That tells you how many times your content have been seen on Facebook. (Impressions). In the arrow you see the number that your shares have been multiplied with. For that blog it is quite impressing, the ten shares have multiplied into 7544 impressions on Facebook.
After the second arrow, to the right, you see “Referral traffic to site“. That tells you how many of the people that saw the content on Facebook actually clicked on it and ended up on your blog or website. In the arrow is the click through rate. For that blog it is 3%. That is by the way the reason why I chose that blog for the screenshot, on this blog that you read right now it is just 0,9%. :) On the sites I have access to I have seen everything between 0,1% and 3,3%. Everything over 1% is good, I would say. So from the ten shares or likes the blog got 227 visits. Who said you cannot get traffic from social media?

What works better, organic shares or like button likes?

Definitely organic shares. If you check the charts you will see that the blog got four likes and six shares. The likes did not deliver a single click back to the blog while the six shares sent 227 visitors back. This is one thing I have thought for a long time, but after tracking Facebook likes and shares I have proof for it as well. The reason is that when sharing content, every friend sees it in their feed, but when liking it only the ones that checks your wall will see the liked content. If a lot of people likes the same thing it will end upp in their friends news feed as well, but it takes a little more likes than this for that.

Things I like with Facebook Insights

You have access to old data! Yes, it is true, Facebook have all your data saved already, you just do not see it until you activate it for your page. But if you activate it in July you can see insights also from January. Or even older data.
It is on Facebook. You does not have to go anywhere else to see the tracking data.

Things that could be improved

Access to the data outside Facebook as well. I would like to get it to Google Analytics :) (Will never happen, though.)
I would like to see different data for different url:s on my sites. For example, the like and share data for this post compared to the like and share data for the Facebook banner post. Now all the likes from the whole domain is together in the soup.. EDIT: Now it is possible to see as well the “popular pages” in Facebook insights.So this is already improved, great!

Track Facebook send button

You can also track the new Facebook send-button. That button is one that visitors on your website can use for sending your content as Facebook messages or mails straight from your website. I have not yet installed that, so I could not track it. But you can do it and tell us how it worked!
Track Facebook likes with insights for your website
Are you going to try to track Facebook likes and shares on your website? What kind of results do you get? Is there anything I have missed? Feel free to drop a comment below!
Thank you for reading this post about tracking Facebook likes, I hope you liked it!
I bet you like these posts as well:

How to Import Facebook Contacts to Google Plus


Importing contacts to Facebook required to follow two steps.Facebook don’t allow Gmail service to import their data. only we can do using yahoo service. if you don’t have yahoo email address, please register and take a one for.
  1. First we Import Facebook contacts to yahoo
  2. then, we  link yahoo profile to access facebook contatcs . that’ it All Your Facebook Friends in GooglePlus.
Hmm….Not getting..don’t worry , here is step by step process explain how to import Facebook contacts to yahoo.Hotmail and Google plus service
  1. How to Import Facebook contacts to Yahoo

Login to  your yahoo email address’s and go to contacts Tab as shown in Below screen
Now click on import contacts , you will be come which various options, where you wold like to import conatcs like  Facebook,Yahoo.GMail and so on Simply click on facebook icon to start importing contacts from facebook
import facebook contactsimportfacebook contacts
After you complete with importing contacts to yahoo, a message comes like as shown in below screenshot.
So, all your friends contacts in yahoo now, yahoo allow us to export those contatcs to various format.

Connect Yahoo Profile from Google Plus to import Facebook Contacts

Get your old Facebook Chat Back

Get your old Facebook Chat Back 

Follow These Steps

** Chrome Settings >> Tools >> Extensions >> Get More Extensions >> type this in search --> "Facebook Chat Sidebar Disabler" >> Install >> Restart Chrome or Refresh FB..
And You Will Get Your Old Fb Chat Back. Enjoyy :)

Friday, 29 July 2011

hair style pics, and stop virus entering in USB


YOU CAN STOP VIRUS ENTERING UR USB DRIVE

FRNDS If you have windows XP with SP2,
then you can disable the writing option to USB drives.

WHAT IT WILL DO?
This trick is very useful if you have virus in your computer and want to copy files from a USB Drive but don’t want to transfer virus to the USB.

STEPS to disable the USB writing option:

To edit the computer registry, first you should log onto your computer with administrative rights.

First click on Start button and type “Regedit” in Run option.

Here locate the location to:

HKEY_LOCAL_MACHINE\SYSTEM\CurrentControlSet\Control

Here in right side panel, click right to create a key with the name “StorageDevicePolicies”.

Now in left side panel, select “StorageDevicePolicies” key, again right click to create new DWORD value then label it “WriteProtect”. Set its value to “1″. But again to enable writing, set its values to “0″.
THATS IT

Now close the registry editor and restart your computer after any changes to go into effect.

CD-ROM Troubleshooting

The maximum a floppy disk can contain is 1.44 MB. To play a game with around 200 MB you are stuck with 100 over diskettes. The CD-ROM is a revolutionary invention that allows up to 625 MB at one time. However, it is read only, which means you can't store in anything.
Buttons Fun
Although most CD-ROMs comes with only 2 buttons, do you know you can also skip, play previous track and play the next track as well with a proper combination? Check properly on your instruction manual for additional functions. You just might be surprised what it can do.
Clean Thoroughly
It is important to clean the CR-ROM at least once every month. Get a CD lens cleaner. If possible, choose one with an alcohol solution drop. This should ensure that your CD-ROM will always be able to read properly.
Clean You CDs
It is just as important to clean your CDs often. Why? Because if you have a speck of dust on the surface of one of your CDs, once spinning at high-speed in the drive, the speck of dust is enough to produce scratches on your precious CD.
Running In DOS
Run List
Like those cool expensive hi-fi systems, you can customize the run list of your Audio CD, only not with the CD-ROM itself. Use Windows' CD player to customize the run list and you can have your CD running in any track order you like.
Read Ahead
The read ahead buffer is useful to speed up things. Go to Control Panel, System. Click on the Performance tab. Click on the File System... button. On the File System Properties, click on CD-ROM. Make sure you have the fullest cache. Even if you have a CD-ROM with less than Quad speed, just move ahead. You'll be surprised to find your CD-ROM running faster.

How to send a voice mail to your friend using Windows XP

E-mail is a most popular and effective way to communicate with others through the internet. You can send documents, pictures and other types of files to any destination but the interesting thing is that you can send also your voice in a mail by attaching the file with e-mail. In windows XP, you can record your voice using Sound Recorder and a microphone options.
Follow the given steps to record your voice in windows XP:
To use this feature, you will need to be logged into your computer with administrative
rights. 
To start recording process, first make sure you have attached a microphone
to your computer.
First click on Start button> All programs> Accessories> click Entertainment and then click on Sound Recorder option.
Now a small "Sound - Sound Recorder" will appear, go to File menu and click on New to start a new file for recording.
Click on Record button to start recording process and start talking then click on Stop button to stop the recording.
Now again click on File menu to save this file with .wav extension to a folder of your choice.
Now send this voice file as an attachment via e-mail message to your friends.   

How to backup of your computer installed drivers

You can easily create the backup of your computer installed drivers (just the particular or all drivers) and use it to troubleshoot any driver problems. This backup will be very useful when you will format your computer window due to any reason. There is no need to search the drivers from internet or drivers CD, just import the driver backup and within five minute, you will complete the driver installation process. You can move this backup from one computer to other computer for installation. 
To complete the all process, we will use a simple tool called DriverMax. Using this tool, we can easily export the backup of any specific or all drivers and then import it for reinstallation later or elsewhere. You can free download (with free registration code) this tool for windows XP and Vista also. Download it and run the easy setup.
After Installation launch DriverMax, the first screen you will get with title "DriverMax - Version" and options "Export drivers, Import drivers and Installed drivers report". Just click on "Export Driver" option to start backup process.


Now after welcome screen, system will take few seconds to create the list of all installed drivers and then show you all installed drivers list.
Here you can select any specific device driver or click on "Select all" button to create the backup of entire installed drivers.
Press the Next button and in next screen you can select the export type (simple backup or in zip format) and then choose the backup location (always choose drive other than C drive).
Again press the Next and system will take some time (depend upon the size of your drivers) to finish exporting the selected drivers.
Click the "Open extraction folder button" to view the backup files or press Close button to finish it.
Now you can use this backup files (using import option) to restore drivers backup or move to any other computer. Copy the Following link to download it.    

How to clear all windows history files with a single click

Today tip will help you to manage the all types of user history in windows operating system. This is a built-in feature of all windows keeps track the user's history, for example the websites you have visited, the documents you have opened and the keywords or files for which you've searched. However this tip is very useful for you, if you are sharing your computer with others or you do not want that the other persons know about your last visited documents history. You can clear these kinds of user's history with a single click on desktop icon named Cleanmru.reg. There is no need to clear each history file one by one. This trick will work in nearly all of the windows versions.


Follow the given steps for configuration to clear recently opened documents automatically: 

To edit the computer registry, first you should log onto your computer with administrative rights.
Here copy the following 6 lines and paste in notepad then save with the name Cleanmru.regon your desktop.
REGEDIT5
[-HKEY_CURRENT_USER\Software\Microsoft\Internet Explorer\TypedURLs]
[-HKEY_CURRENT_USER\Software\Microsoft\Windows\CurrentVersion\Explorer\RunMRU]
[-HKEY_CURRENT_USER\Software\Microsoft\Windows\CurrentVersion\Explorer\RecentDocs]
[-HKEY_CURRENT_USER\Software\Microsoft\Windows\CurrentVersion\Explorer\ComDlg32\
LastVisitedMRU] 
[-HKEY_CURRENT_USER\Software\Microsoft\Search Assistant\ACMru]

Thursday, 28 July 2011

Unlimited Free calls to anyone Worldwide.

Unlimited Free calls to anyone Worldwide.

Everyone loves to hear a trick related to Free Calls,Free SMS or something which has a word Free in it and it should be there because @ this time if u want to live than you need to have some guide to the free world.So here I am sharing with you best trick to call for free worldwide unlimitedly and anonymously. Now for the calling part we will use a website called economy calling which is right now in the BETA Stage and they are providing free calls for the testing purpose so why not utilize their testing as a free calling project so just tune into the trick by following the below steps:
1. Go to http://economycalling.com/
2. Put your number in the left block and ur Friends Number in the right block.
3. Hit Submit
4. They will tell you too call some number don’t worry its absolutely free as tested by me and it’s a Indian number.
5. After you call that number just disconnect after 2 rings and you will get a call back which will connect you too your friend and its totally anonymous because he will receive call from the Indian number but an Unknown Number.
So that’s it guys this trick ends here but the adventure to more tricks will just continue.So don’t miss even a single small post

Facebook Virus Prank – Making fun of your friendzz

Facebook Virus Prank – Making fun of your friendzz


Facebook Virus Prank – Making fun of your friendzz

 In this post i’ll show you an easy step by step tutorial about how to make a Facebook virus using simple commands on notepad. This will make the victims think that they have a virus when they click on an icon such as Internet Explorer or Mozilla Firefox…
This “virus” is totlly harmless and won’t do any damage to your victims computer.
When a victim clicks on the icon he will get a warning message like “WARNING VIRUS DETECTED!!!!! AFTER 5 MINUTES YOUR FACEBOOK ACCOUNT WILL BE DELETED !!!!TO REMOVE THE VIRUS CLICK OK OR CLOSE THIS BOX!”. You can change the text to whatever you want. If you have some other interesting ideas, let me know. This virus doesn’t do anything to your friends pc, but to see his scared face, that’s something :) …
Now let’s start with the tutorial:
1) Open notepad
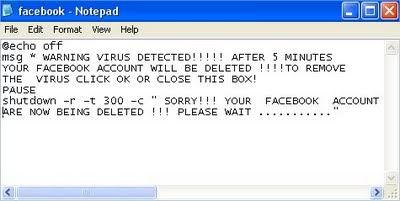
2) Type the following text in :
@echo off
msg * WARNING VIRUS DETECTED!!!!! AFTER 5 MINUTES YOUR FACEBOOK ACCOUNT WILL BE DELETED !!!!TO REMOVE THE VIRUS CLICK OK OR CLOSE THIS BOX!
PAUSE
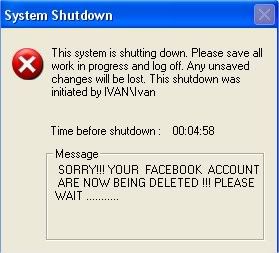
shutdown -r -t 300 -c ” SORRY!!! YOUR FACEBOOK ACCOUNT ARE NOW BEING DELETED !!! PLEASE WAIT ………..”

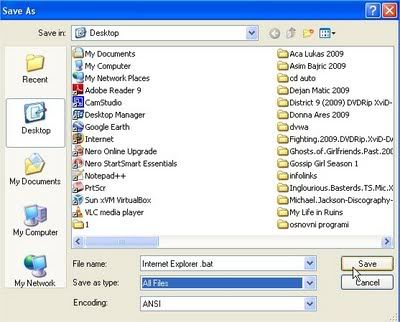
3) Save as
Internet Explorer .bat (or whatever you want, but be shure that the last letters are .bat)
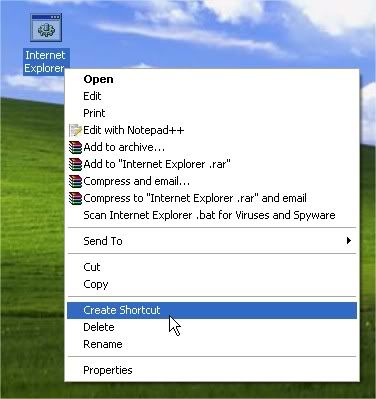
4) Right click on
Internet Explorer .bat and click Create Shortcut

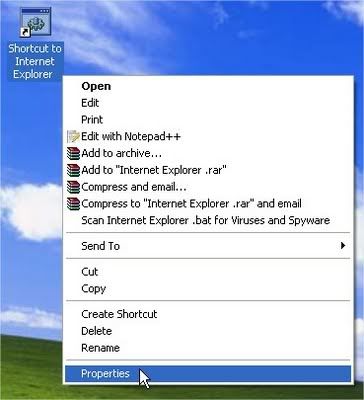
5) Right click on shorcut and click Properties.
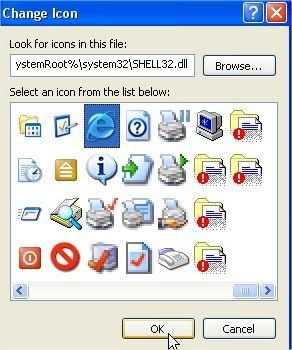
6)Click Change Icon
7) Choose
Internet Explorer icon (or Mozilla Firefox, or any other icon similar to it), click OK , then click Apply

8)Delete real shortcut and replace it with fake . When victim click on it , he will get warning messages that looks like this:

script of free chat room

EveryWhereChat Free Flash Chatrooms